Konular
- 3d Max Uygulamalar5
- 3d Studio Max11
- Açık Kaynak İşletim Sistemleri18
- Adobe Illustrator7
- Ajax11
- Akıllı Tahta1
- Algoritma8
- Android6
- Apache Web Sunucusu19
- Arduino11
- Asp1
- Asp.net1
- Autocad Dersleri1
- Autocad Uygulamaları16
- Bilgisayar Donanımları57
- Bilgisayara Giriş44
- Bilgisayara Giriş Uygulamaları8
- Bilim9
- Bilim Insanları2
- Bilişim Teknolojileri13
- Blender4
- Blockchain Teknolojileri14
- Bootstrap23
- C Dersleri32
- C Programlama örnekleri3
- C# Dersleri47
- C++ Dersleri12
- Cgı Nedir?1
- Css61
- Css Ugulama Örnekleri41
- Dns2
- Docker4
- Dreamweaver175
- Dreamweaver Uygulamaları18
- E- Ticaret5
- Eğitici Hikayeler22
- Elektronik3
- Elektronik Posta (email)11
- Emperyalizm3
- Firefox37
- Fireworks1
- Fireworks Uygulaması3
- Flash Actionscript10
- Flash Dersleri8
- Flash Örnek Uygulamalar7
- Gerekli Programlar3
- Google Docs22
- Google Teknolojileri11
- Html Dersleri66
- Hz. Muhammed ( Sav)1
- Ileri Excel2
- Infographics1
- Internet14
- İngilizce6
- Java Applet Örnekleri82
- Java Applet Temelleri74
- Java Application Örnekleri10
- Java Netbeans Ide16
- Java Temel Örnekler46
- Java Temelleri157
- Javascript111
- Javascript Uygulama45
- Jquery12
- Jquery Örnekleri11
- Kızılderililer1
- Kişisel Gelişim8
- Libre Office Dersleri3
- Linux Bash Script5
- Linux Işletim Sistemi103
- Linux Server50
- Linux Web Filter43
- Milli Eğitim Bakanlığı7
- Ms Excel Dersleri8
- Ms Excel Uygulamaları23
- Ms Word Dersleri350
- Ms Word Uygulamaları43
- Mssql Veri Tabanı11
- Mysql Veri Tabanı10
- Network34
- Online Ücretsiz Yazılımlar1
- Ödev Konuları3
- Pascal1
- Photoshop Dersleri460
- Photoshop Uygulama Örnekleri1
- Photoshop Uygulamaları58
- Php Dersleri97
- Php Uygulamaları33
- Phpmyadmin2
- Postgresql Veri Tabanı61
- Power Point2
- Programlama5
- Proje Hazırlama15
- Python31
- Python Uygulamalar13
- Qbasic19
- React Native14
- Regular Expressions1
- Robotik Kodlama1
- Scratch İle Kodlama Dersleri84
- Seo6
- Teknik Servis9
- Teknoloji4
- Teknoloji Tasarım Uygulamaları16
- Ücretsiz Uygulamalar1
- Veri Tabanı63
- Web Tasarım16
- Web Uygulamaları1
- Windows Os15
- Windows Server3
- Xml5
- Yapay Zeka1
- Yazılım Dünyası20
Videolar
- Ahilik Teşkilatı
- Amerika
- Animasyon Örnekleri
- Atom Seviyesi
- Bakış Açısı
- Bilgisayar Donanımları
- Bilişim Teknolojileri
- Biyoteknoloji
- Bootstrap
- Dijital Dönüşüm
- Doğal Enerji
- Eğitim Sistemi
- Eğitim Teknolojileri
- Elektronik
- Geleceğin Araçları
- Geri Dönüşüm
- Hayvan Sevgisi
- Illustrator
- Ingilice Dersleri
- Insan Yetenekleri
- Işletim Sistemi
- İslam
- Marşlar
- Mekanik
- Microsoft Visual Studio
- Microsoft Word Dersleri
- Mssql Server
- Müslüman Mucitler
- Network / Ağ
- Php Dersleri
- Programlama
- Psikoloji
- Python Dersleri
- Robotlar
- Savunma Sanatları
- Sketchup Nedir?
- Şaşırtıcı Bilim
- Tarih
- Tasarımlar
- Teknoloji
- Türk Tarihi
- Uzay
- Vücud Geliştirme
- Windows Sorunları
- Yazılım Der
- Yazılım Dünyası
Testler
- 5. Sınıf Matematik Testleri
- Açık Kaynak İşletim Sistemleri
- Açık Kaynak Office
- Ağ Temelleri
- Autocad
- Bilgisayara Giriş
- Bilişim Teknik Resimi
- Bilişim Teknolojilerinin Temelleri
- Cografya
- Css-javascript
- Flash
- Google Teknolojileri
- Görsel Programlama
- Html
- Illustrator
- İşletmede Beceri Eğitimi
- Java
- Javascript
- Libre Office
- Mesleki Gelişim
- Mesleki İngilizce
- Ms Office Word
- Photoshop
- Php
- Programlama Temelleri
- Python
- Temel Elektronik
- Veri Tabanı
- Web Programlama
- Web Tasarım
EBooklar
Bilgisayar İşletmenliği Kurs Notları
Çeşitli kaynaklardan derlenmiş ve derlenmeye devam eden kurs notları
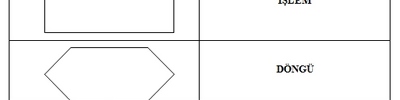
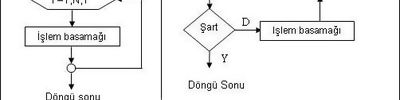
Akış diagram sembolleri
Bir program taslağı hazırlamak için atılması gereken ilk adım, oluşturacağımız programın çıktısının tam olarak ne olduğunu belirlemek. Programın oluşturulma amacını ve bir bakıma programdan ne elde edilmesi gerektiğine karar vermektir. İkinci adım,
Linux Kernel (Çekirdek) nedir?
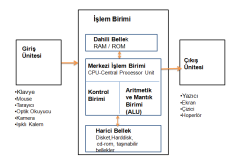
Linux kernel işletim sisteminin çekirdeğidir. Bütün sistemin kontrolünden sorumludur. Yazılım ile donanım arasındaki bağlantıyı sağlar. Dosya sistemleri, kullanıcılar, uygulamalar, sürücüler vs. hepsi kernel tarafından kontrol edilir.
Lisans Gerektirmeyen Programlar
GNU Özgür Belgeleme Lisansı.Bu lisansın amacı, bir kullanıcı kılavuzuna, bir ders kitabı veya başka işlevsel ve faydalı bir belgeye, herkesin, etkili bir kullanım hakkıyla, ticari veya gayri-ticari, değiştirerek ya da olduğu gibi, almak ve tekrar dağıtmak
Son Eklenen Konular
-
C# Dersleri : C# ile Mysql Veri Tabanına Veri Eklemek
-
Java Netbeans Ide : Ubuntu / Debian'a Netbeans 24/25/29/30 Yükleme ve Kaldırma İşlemleri
-
React Native : Offline React Native Kullanmak
-
React Native : Form Tasarımları
-
Linux Web Filter : pfSense Sertifika Korumalı Ayarlar (MEB Hattında da çalışmakta)
-
React : React internetsiz (off-lne) web uygulaması nasıl yapılır?
-
Bootstrap : Modal Kullanımı
-
Bootstrap : Bootstrap 4 Navbar Menü Örnekleri
Normal bootstrap 4 navabarı ile fare üzerine gelince açılan, yatayda tüm ekranı kaplayan ve zemininde siyah gölgesi olan menü örnek kodları.
-
C# Dersleri : Form Uygulamaları
-
C# Dersleri : DataSource
-
C# Dersleri : DataBindings
-
C# Dersleri : Mask
-
React Native : useState
useState, React Native’de değişkenlerin değerini dinamik olarak tutmak için kullanılır.
-
C# Dersleri : Form işlemleri
-
C# Dersleri : Web Tarayıcısı Yapımı
-
Docker : WSL