Masaüstü Takvim Uygulaması
İnglizce bir makaledir.
 Introduction
To keep track of date and time, there are many classes in Java containing date and time functions, I am talking about Calendar, GrerogianCalendar, Timestamp... In this tutorial, we will make a calendar with previous and next buttons to change month, and a combo box to change the year. It covers the basics about GUIs, tables, events and renderers. It is important you follow every step carefully and you understand before proceeding. Let's get started.
Declaring the GUI components
The first step in every GUI (and in any program anyway) is declaring the variables. We will need 8 visible components: the frame itself, the container, the next button, the previous button, the month's label, the calendar itself (which is a JTable), the label to choose the year and the year combo box itself. Why visible components? Well, there are 2 more components we need to make: the table model and the scrollpane for the table. Let's create our class called CalendarProgram:
public static void main (String args[]){
}
}
From now on, I assume you know what the above example means. If you don't, you will not be able to follow this tutorial, I recommend you take a basics tutorial about it. Now that our class is declared, we will declare static variables. This is done this way:
The value field is optional, you could just declare the name. We will declare all our components, I will explain something after. By the way, we need some packages (declared in the following code):
import javax.swing.event.*;
import javax.swing.table.*;
import java.awt.*;
import java.awt.event.*;
import java.util.*;
public class calendarProgram{
static JLabel lblMonth, lblYear;
static JButton btnPrev, btnNext;
static JTable tblCalendar;
static JComboBox cmbYear;
static JFrame frmMain;
static Container pane;
static DefaultTableModel mtblCalendar; //Table model
static JScrollPane stblCalendar; //The scrollpane
static JPanel pnlCalendar; //The panel
static int realDay, realMonth, realYear, currentMonth, currentYear;
public static void main (String args[]){
}
}
This is quite easy to understand (for now). We imported the packages and we declared the static variables (e.g. the GUI components). But there is a component, DefaultTableModel, which is invisible but useful. It will be the model the table will use. Every JTable must have a model in order to work. Make sure you understand fully the above code.
Setting the Look and Feel
Every Java program using a GUI (unless you want the ugly Java theme) must have a Look and Feel. This is a "theme" matching your operating system. Setting the theme is quite easy, paste this in your main void:
catch (ClassNotFoundException e) {}
catch (InstantiationException e) {}
catch (IllegalAccessException e) {}
catch (UnsupportedLookAndFeelException e) {}
Here you are done with the theme. This is a simple step to make your program nice-looking. You will have your program matching your OS (OS stands for Operating System).
Creating the components
You must understand the concept of "instantiating" an object. Instantiating an object is the same as creating it. This is done with the "new" keyword. Example:
Every object has its own constructor (the method to create the object). Objects can have more than one possible constructor. The JLabel object takes a String as a parameter for the constructor, which will be the text to be displayed in the label. Let's create all the GUI components:
lblMonth = new JLabel ("January");
lblYear = new JLabel ("Change year:");
cmbYear = new JComboBox();
btnPrev = new JButton ("<<");
btnNext = new JButton (">>");
mtblCalendar = new DefaultTableModel();
tblCalendar = new JTable(mtblCalendar); //Table using the above model
stblCalendar = new JScrollPane(tblCalendar); //The scrollpane of the above table
pnlCalendar = new JPanel(null); //Create the "panel" to place components
Let's take a look at the constructors:
JFrame: String - The text to be shown in the window's title bar.
JLabel: String - The text to be shown in the label.
JComboBox: None
JButton: String - The text displayed in the button.
DefaultTableModel: None
JTable: DefaultTableModel - The model this table will use.
JScrollPane: Any component - The component using this scrollpane.
JPanel: Layout - The layout used in this panel.
We have not instantiated the Container object. You will find out why.
Preparing the frame
The objects are instantiated, but nothing is functional for now. We have a few steps before. First, we must set the size of the window by invoking the setSize method of JFrame:
Now we will use our Container:
We did not instantiate the Container, and we already use it. Why? Some objects cannot be instantiated. This is weird but true. Next, we must set the layout of the frame. There are plenty layouts, but we will simply use the null layout, best of all. Here you go:
Finally (optional but recommended) we will tell the program to quit when we click the X button:
So let's put all this together:
try {UIManager.setLookAndFeel(UIManager.getSystemLookAndFeelClassName());}
catch (ClassNotFoundException e) {}
catch (InstantiationException e) {}
catch (IllegalAccessException e) {}
catch (UnsupportedLookAndFeelException e) {}
//Prepare frame
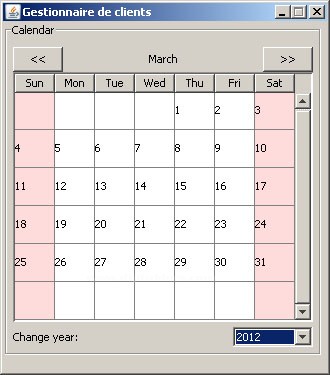
frmMain = new JFrame ("Gestionnaire de clients"); //Create frame
frmMain.setSize(330, 375); //Set size to 330x375 pixels
pane = frmMain.getContentPane(); //Get content pane
pane.setLayout(null); //Apply null layout
frmMain.setDefaultCloseOperation(JFrame.EXIT_ON_CLOSE); //Close when X is clicked
//Create controls
lblMonth = new JLabel ("January");
lblYear = new JLabel ("Change year:");
cmbYear = new JComboBox();
btnPrev = new JButton ("<<");
btnNext = new JButton (">>");
mtblCalendar = new DefaultTableModel();
tblCalendar = new JTable(mtblCalendar);
stblCalendar = new JScrollPane(tblCalendar);
pnlCalendar = new JPanel(null);
Setting the border of the panel
Every JPanel is a container and should have a border. You know, the panels with a border around something... Well, this is done with a single statement:
The setBorder(border) method of all components does the job. BorderFactory is a class that generated many different types of borders, up to you to find out!
Adding the components to the Container
We created all, and we are ready to build our GUI. We will first of all add the components to a Container (pane). This is done with the add method of the container.
pane.add(pnlCalendar);
pnlCalendar.add(lblMonth);
pnlCalendar.add(lblYear);
pnlCalendar.add(cmbYear);
pnlCalendar.add(btnPrev);
pnlCalendar.add(btnNext);
pnlCalendar.add(stblCalendar);
We added all the controls. Or alomst all. The table model and the table itself were not added, but the scrollpane was. It is simple: by adding the scrollpane, we automatically added the table contained in it and this also caused the model to be "added". All components are now in place, we must position them.
Positionning the controls
The setBounds method of all components will be used to set their position in the container (in this case, the container is pane). It takes four parameters: x, y, width, height. Simple enough. You will find out in this code:
pnlCalendar.setBounds(0, 0, 320, 335);
lblMonth.setBounds(160-lblMonth.getPreferredSize().width/2, 25, 100, 25);
lblYear.setBounds(10, 305, 80, 20);
cmbYear.setBounds(230, 305, 80, 20);
btnPrev.setBounds(10, 25, 50, 25);
btnNext.setBounds(260, 25, 50, 25);
stblCalendar.setBounds(10, 50, 300, 250);
All right, nothing new here except one thing: lblMonth.getPreferredSize().width. This method returns the preferred size of a component (e.g. its default size). If the JLabel's text changes, its preferred size is also altered. We want in centered in the center of the calendar on the X axis so we get the middle point of the calendar on X (160) and we substract half the label's size, causing the label to be perfectly aligned with the calendar!
Making the frame visible
Add those two self-explanatory lines after your code:
frmMain.setVisible(true);
Useless to explain what they do. They both take a boolean as an argument. Now let's start the real fun!
Getting the real month and year
To show at startup the appropriate calendar, it would be great to know which month and year we are in. Remember we imported java.util.* before? That's here we will find its utility. The GregorianCalendar class contained in this package contains a big bunch of date and time functions. We will create a GregorianCalendar and get the info. If we instantiate (see definition above) this class without any parameters, the actual calendar is created, and this is what we are looking for. Let's do it:
//Get real month/year
GregorianCalendar cal = new GregorianCalendar(); //Create calendar
realDay = cal.get(GregorianCalendar.DAY_OF_MONTH); //Get day
realMonth = cal.get(GregorianCalendar.MONTH); //Get month
realYear = cal.get(GregorianCalendar.YEAR); //Get year
currentMonth = realMonth; //Match month and year
currentYear = realYear;
Now, the four integers we declared above are now used. The realMonth and realYear integers contain the real month and year. The currentYear and currentMonth variables contain the actual month/year we are viewing the calendar. Now, let the fun begin! We will populate the year combo box and show the calendar!
Populating the combo box
In this tutorial, we will be able to view the calendars from 100 years ago to 100 years in the future, but changing this is quite easy. First, let's populate the combo box (I assume you know how a for loop works):
for (int i=realYear-100; i<=realYear+100; i++){
cmbYear.addItem(String.valueOf(i));
}
Something I haven't explained is here: String.valueOf(i). This simply returns a String which is equal to the String value of i. Simple enough. Test your application. The calendar is simply a dark gray rectangle, but the combo box is populated. We will prepare the calendar.
Preparing the calendar
Now the calendar is only a dark gray square, but let's make room for the numbers! We need 6 rows and 7 columns, for every day of the week. We need a white background (later we will make the week-end days appear red), a grid and headers for the week days. Let's add the headers:
String[] headers = {"Sun", "Mon", "Tue", "Wed", "Thu", "Fri", "Sat"}; //All headers
for (int i=0; i<7; i++){
mtblCalendar.addColumn(headers[i]);
}
The loop will put all elements of the headers array (containing the days' names) as column headers. Now, we need to set the white background:
This is needed because the area not covered with the cells does not belong to the JTable itself, so we can't just use tblCalendar.setBackground(color). This is very strange but it must be done the above way. Next thing: disallow column resizing/reordering. This is done a really simple way:
tblCalendar.getTableHeader().setResizingAllowed(false);
tblCalendar.getTableHeader().setReorderingAllowed(false);
Pretty self-explanatory. Now, we need to be able to select only one cell at a time to make it more realistic. Again, this is simple:
tblCalendar.setColumnSelectionAllowed(true);
tblCalendar.setRowSelectionAllowed(true);
tblCalendar.setSelectionMode(ListSelectionModel.SINGLE_SELECTION);
I do not really need to explain this one. Finally, let's prepare a 7x6 calendar:
tblCalendar.setRowHeight(38);
mtblCalendar.setColumnCount(7);
mtblCalendar.setRowCount(6);
These 3 methods do the job. Run your program. The only thing missing is the numbers! Let's add them. But just before, the full preparation code:
String[] headers = {"Sun", "Mon", "Tue", "Wed", "Thu", "Fri", "Sat"}; //All headers
for (int i=0; i<7; i++){
mtblCalendar.addColumn(headers[i]);
}
tblCalendar.getParent().setBackground(tblCalendar.getBackground()); //Set background
tblCalendar.getTableHeader().setResizingAllowed(false);
tblCalendar.getTableHeader().setReorderingAllowed(false);
tblCalendar.setColumnSelectionAllowed(true);
tblCalendar.setRowSelectionAllowed(true);
tblCalendar.setSelectionMode(ListSelectionModel.SINGLE_SELECTION);
tblCalendar.setRowHeight(38);
mtblCalendar.setColumnCount(7);
mtblCalendar.setRowCount(6);
//Prepare calendar
for (int i=realYear-100; i<=realYear+100; i++){
cmbYear.addItem(String.valueOf(i));
}
Please note: it is mendatory that you put the loop to populate the combo box after the preparation of the table. Otherwise, the action listener of the combo box will be fired and since the table is not prepared the program will throw an error. It would be much better with the numbers! Let's go!
Refreshing the calendar
If you are still following this tutorial correctly (and I hope you do), you should have a blank calendar, only the numbers are missing. Create a method outside your main void:
}
This will be called to refresh the calendar. In your main void, after your code, put:
Back in the method we just created, we start by declaring an array containing the months' real names and we decide if the next/previous buttons should be enabled, depending if we reached our capacity (100 years ago or in the future, remember). Also, we create two integers, one to determine the number of days in that month and the other to determine the day of week of the first day of that month.
String[] months = {"January", "February", "March", "April", "May", "June", "July", "August", "September", "October", "November", "December"};
int nod, som; //Number Of Days, Start Of Month
btnPrev.setEnabled(true); //Enable buttons at first
btnNext.setEnabled(true);
if (month == 0 && year <= realYear-10){btnPrev.setEnabled(false);} //Too early
if (month == 11 && year >= realYear+100){btnNext.setEnabled(false);} //Too late
lblMonth.setText(months[month]); //Refresh the month label (at the top)
lblMonth.setBounds(160-lblMonth.getPreferredSize().width/2, 25, 180, 25); //Re-align label with calendar
cmbYear.setSelectedItem(String.valueOf(year)); //Select the correct year in the combo box
}
Make sure the previous example is fully understood before proceeding. Now, remember the nod and som variables we declared, we will now assign values to them:
GregorianCalendar cal = new GregorianCalendar(year, month, 1);
nod = cal.getActualMaximum(GregorianCalendar.DAY_OF_MONTH);
som = cal.get(GregorianCalendar.DAY_OF_WEEK);
Remember what I said above: the constructor of GregorianCalendar with no arguments is the actual date. But in this one we gave 3 arguments: the year, the month and the day (first of the month). The get methods will get the required informations, this is self-explanatory. Now, the refreshCalendar() method will be called more than once in the code execution, so we must clear all the calendar every time in order to draw the new one. This is done that way:
for (int i=0; i<6; i++){
for (int j=0; j<7; j++){
mtblCalendar.setValueAt(null, i, j);
}
}
Two for loops nested, and a new method: setValueAt. This takes 3 parameters: value, row and column. So the loop loops through all the cells and assigns a null value to all of them, causing the table to be cleared. Lastly, we are ready to draw the calendar, using this loop:
for (int i=1; i<=nod; i++){
int row = new Integer((i+som-2)/7);
int column = (i+som-2)%7;
mtblCalendar.setValueAt(i, row, column);
}
Here's how your method should look by now:
String[] months = {"January", "February", "March", "April", "May", "June", "July", "August", "September", "October", "November", "December"};
int nod, som; //Number Of Days, Start Of Month
//Prepare buttons
btnPrev.setEnabled(true); //Enable buttons at first
btnNext.setEnabled(true);
if (month == 0 && year <= realYear-10){btnPrev.setEnabled(false);} //Too early
if (month == 11 && year >= realYear+100){btnNext.setEnabled(false);} //Too late
lblMonth.setText(months[month]); //Refresh the month label (at the top)
lblMonth.setBounds(160-lblMonth.getPreferredSize().width/2, 25, 180, 25); //Re-align label with calendar
cmbYear.setSelectedItem(String.valueOf(year)); //Select the correct year in the combo box
//Get number of days and start of month
GregorianCalendar cal = new GregorianCalendar(year, month, 1);
nod = cal.getActualMaximum(GregorianCalendar.DAY_OF_MONTH);
som = cal.get(GregorianCalendar.DAY_OF_WEEK);
//Clear table
for (int i=0; i<6; i++){
for (int j=0; j<7; j++){
mtblCalendar.setValueAt(null, i, j);
}
}
for (int i=1; i<=nod; i++){
int row = new Integer((i+som-2)/7);
int column = (i+som-2)%7;
mtblCalendar.setValueAt(i, row, column);
}
}
Run the program. Nice! You got the calendar! As stated above, we will make the weekend days appear red. This is now one of the most difficult things in Java programming: writing custom renderers! Let's dig in (or at least try).
Writing the custom renderer
This step is not mendatory but I recommend you learn it if you want to write other kinds of renderers later. First, we need to declare (again) the renderer outside our method:
}
I hope you understand the "extends" concept. Now that this is declared, we declare the main method of it, which will apply the renderer:
public Component getTableCellRendererComponent (JTable table, Object value, boolean selected, boolean focused, int row, int column){
super.getTableCellRendererComponent(table, value, selected, focused, row, column);
return this;
}
}
It is starting to make sense. As you have probably noticed, a few parameters can be read: row, column, value, and so on. We will see if the column is either 0 or 6 (sunday or saturday) and apply a red color. Also, the current day will appear blue:
public Component getTableCellRendererComponent (JTable table, Object value, boolean selected, boolean focused, int row, int column){
super.getTableCellRendererComponent(table, value, selected, focused, row, column);
if (column == 0 || column == 6){ //Week-end
setBackground(new Color(255, 220, 220));
}
else{ //Week
setBackground(new Color(255, 255, 255));
}
if (value != null){
if (Integer.parseInt(value.toString()) == realDay && currentMonth == realMonth && currentYear == realYear){ //Today
setBackground(new Color(220, 220, 255));
}
}
setBorder(null);
setForeground(Color.black);
return this;
}
}
We finished our renderer! This was quite a simple one, now we need to apply it. In the refreshCalendar method, at the end, write:
The setDefaultRenderer method applies the renderer to the table. The first parameter can be any class, it is not used (I don't even know why it exists). The second is the renderer. Now run the program. What a nice looking calendar! But since nothing in life is ever finished, we will create the actions for the buttons and the year combo.
Registering action listeners
Anywhere in the main void, add these self-explanatory lines:
btnPrev.addActionListener(new btnPrev_Action());
btnNext.addActionListener(new btnNext_Action());
cmbYear.addActionListener(new cmbYear_Action());
These are the events that will be triggered when the buttons will be clicked, or we will select an item in the year combo. Pretty easy, no? Anyway, here is the action for the prevous button:
public void actionPerformed (ActionEvent e){
if (currentMonth == 0){ //Back one year
currentMonth = 11;
currentYear -= 1;
}
else{ //Back one month
currentMonth -= 1;
}
refreshCalendar(currentMonth, currentYear);
}
}
The code is simple: if we are in January (month 0), it goes to the month of December of the previous year. Else, it goes back one year. Then, the calendar is refreshed. Now here is the one for the next button, no explanation needed:
public void actionPerformed (ActionEvent e){
if (currentMonth == 11){ //Foward one year
currentMonth = 0;
currentYear += 1;
}
else{ //Foward one month
currentMonth += 1;
}
refreshCalendar(currentMonth, currentYear);
}
}
The opposite of the previous listener. Now let's do the one for the combo box:
static class cmbYear_Action implements ActionListener{
public void actionPerformed (ActionEvent e){
if (cmbYear.getSelectedItem() != null){
String b = cmbYear.getSelectedItem().toString();
currentYear = Integer.parseInt(b); //Get the numeric value
refreshCalendar(currentMonth, currentYear); //Refresh
}
}
}
Put these 3 action listeners outside your existing methond but in the main class. Run the program. Fine! Double-click on a cell. Oops, it is editable. We do not want this. How do we fix it? Find the line:
Replace this line by:
This is called method overriding. It simply overrides the exitsing method, making the cells uneditable. Now all our code is written!
Putting it all together to work
If you followed this tutorial correctly, you should get this:
/*Contents of CalendarProgran.class */


//Import packages

import javax.swing.*;

import javax.swing.event.*;

import javax.swing.table.*;

import java.awt.*;

import java.awt.event.*;

import java.util.*;


public class CalendarProgram{

    static JLabel lblMonth, lblYear;

    static JButton btnPrev, btnNext;

    static JTable tblCalendar;

    static JComboBox cmbYear;

    static JFrame frmMain;

    static Container pane;

    static DefaultTableModel mtblCalendar; //Table model

    static JScrollPane stblCalendar; //The scrollpane

    static JPanel pnlCalendar;

    static int realYear, realMonth, realDay, currentYear, currentMonth;


    public static void main (String args[]){

        //Look and feel

        try {UIManager.setLookAndFeel(UIManager.getSystemLookAndFeelClassName());}

        catch (ClassNotFoundException e) {}

        catch (InstantiationException e) {}

        catch (IllegalAccessException e) {}

        catch (UnsupportedLookAndFeelException e) {}


        //Prepare frame

        frmMain = new JFrame ("Gestionnaire de clients"); //Create frame

        frmMain.setSize(330, 375); //Set size to 400x400 pixels

        pane = frmMain.getContentPane(); //Get content pane

        pane.setLayout(null); //Apply null layout

        frmMain.setDefaultCloseOperation(JFrame.EXIT_ON_CLOSE); //Close when X is clicked


        //Create controls

        lblMonth = new JLabel ("January");

        lblYear = new JLabel ("Change year:");

        cmbYear = new JComboBox();

        btnPrev = new JButton ("<<");

        btnNext = new JButton (">>");

        mtblCalendar = new DefaultTableModel(){public boolean isCellEditable(int rowIndex, int mColIndex){return false;}};

        tblCalendar = new JTable(mtblCalendar);

        stblCalendar = new JScrollPane(tblCalendar);

        pnlCalendar = new JPanel(null);


        //Set border

        pnlCalendar.setBorder(BorderFactory.createTitledBorder("Calendar"));


        //Register action listeners

        btnPrev.addActionListener(new btnPrev_Action());

        btnNext.addActionListener(new btnNext_Action());

        cmbYear.addActionListener(new cmbYear_Action());


        //Add controls to pane

        pane.add(pnlCalendar);

        pnlCalendar.add(lblMonth);

        pnlCalendar.add(lblYear);

        pnlCalendar.add(cmbYear);

        pnlCalendar.add(btnPrev);

        pnlCalendar.add(btnNext);

        pnlCalendar.add(stblCalendar);


        //Set bounds

        pnlCalendar.setBounds(0, 0, 320, 335);

        lblMonth.setBounds(160-lblMonth.getPreferredSize().width/2, 25, 100, 25);

        lblYear.setBounds(10, 305, 80, 20);

        cmbYear.setBounds(230, 305, 80, 20);

        btnPrev.setBounds(10, 25, 50, 25);

        btnNext.setBounds(260, 25, 50, 25);

        stblCalendar.setBounds(10, 50, 300, 250);


        //Make frame visible

        frmMain.setResizable(false);

        frmMain.setVisible(true);


        //Get real month/year

        GregorianCalendar cal = new GregorianCalendar(); //Create calendar

        realDay = cal.get(GregorianCalendar.DAY_OF_MONTH); //Get day

        realMonth = cal.get(GregorianCalendar.MONTH); //Get month

        realYear = cal.get(GregorianCalendar.YEAR); //Get year

        currentMonth = realMonth; //Match month and year

        currentYear = realYear;


        //Add headers

        String[] headers = {"Sun", "Mon", "Tue", "Wed", "Thu", "Fri", "Sat"}; //All headers

        for (int i=0; i<7; i++){

            mtblCalendar.addColumn(headers[i]);

        }


        tblCalendar.getParent().setBackground(tblCalendar.getBackground()); //Set background


        //No resize/reorder

        tblCalendar.getTableHeader().setResizingAllowed(false);

        tblCalendar.getTableHeader().setReorderingAllowed(false);


        //Single cell selection

        tblCalendar.setColumnSelectionAllowed(true);

        tblCalendar.setRowSelectionAllowed(true);

        tblCalendar.setSelectionMode(ListSelectionModel.SINGLE_SELECTION);


        //Set row/column count

        tblCalendar.setRowHeight(38);

        mtblCalendar.setColumnCount(7);

        mtblCalendar.setRowCount(6);


        //Populate table

        for (int i=realYear-100; i<=realYear+100; i++){

            cmbYear.addItem(String.valueOf(i));

        }


        //Refresh calendar

        refreshCalendar (realMonth, realYear); //Refresh calendar

    }


    public static void refreshCalendar(int month, int year){

        //Variables

        String[] months =  {"January", "February", "March", "April", "May", "June", "July", "August", "September", "October", "November", "December"};

        int nod, som; //Number Of Days, Start Of Month


        //Allow/disallow buttons

        btnPrev.setEnabled(true);

        btnNext.setEnabled(true);

        if (month == 0 && year <= realYear-10){btnPrev.setEnabled(false);} //Too early

        if (month == 11 && year >= realYear+100){btnNext.setEnabled(false);} //Too late

        lblMonth.setText(months[month]); //Refresh the month label (at the top)

        lblMonth.setBounds(160-lblMonth.getPreferredSize().width/2, 25, 180, 25); //Re-align label with calendar

        cmbYear.setSelectedItem(String.valueOf(year)); //Select the correct year in the combo box


        //Clear table

        for (int i=0; i<6; i++){

            for (int j=0; j<7; j++){

                mtblCalendar.setValueAt(null, i, j);

            }

        }


        //Get first day of month and number of days

        GregorianCalendar cal = new GregorianCalendar(year, month, 1);

        nod = cal.getActualMaximum(GregorianCalendar.DAY_OF_MONTH);

        som = cal.get(GregorianCalendar.DAY_OF_WEEK);


        //Draw calendar

        for (int i=1; i<=nod; i++){

            int row = new Integer((i+som-2)/7);

            int column  =  (i+som-2)%7;

            mtblCalendar.setValueAt(i, row, column);

        }


        //Apply renderers

        tblCalendar.setDefaultRenderer(tblCalendar.getColumnClass(0), new tblCalendarRenderer());

    }


    static class tblCalendarRenderer extends DefaultTableCellRenderer{

        public Component getTableCellRendererComponent (JTable table, Object value, boolean selected, boolean focused, int row, int column){

            super.getTableCellRendererComponent(table, value, selected, focused, row, column);

            if (column == 0 || column == 6){ //Week-end

                setBackground(new Color(255, 220, 220));

            }

            else{ //Week

                setBackground(new Color(255, 255, 255));

            }

            if (value != null){

                if (Integer.parseInt(value.toString()) == realDay && currentMonth == realMonth && currentYear == realYear){ //Today

                    setBackground(new Color(220, 220, 255));

                }

            }

            setBorder(null);

            setForeground(Color.black);

            return this;

        }

    }


    static class btnPrev_Action implements ActionListener{

        public void actionPerformed (ActionEvent e){

            if (currentMonth == 0){ //Back one year

                currentMonth = 11;

                currentYear -= 1;

            }

            else{ //Back one month

                currentMonth -= 1;

            }

            refreshCalendar(currentMonth, currentYear);

        }

    }

    static class btnNext_Action implements ActionListener{

        public void actionPerformed (ActionEvent e){

            if (currentMonth == 11){ //Foward one year

                currentMonth = 0;

                currentYear += 1;

            }

            else{ //Foward one month

                currentMonth += 1;

            }

            refreshCalendar(currentMonth, currentYear);

        }

    }

    static class cmbYear_Action implements ActionListener{

        public void actionPerformed (ActionEvent e){

            if (cmbYear.getSelectedItem() != null){

                String b = cmbYear.getSelectedItem().toString();

                currentYear = Integer.parseInt(b);

                refreshCalendar(currentMonth, currentYear);

            }

        }

    }

}
Run the program. Enjoy!
Conclusion
Well, we arrived at the end of this tutorial. This was a pretty complex one, do not worry if you do not fully understand it. But sooner or later, you will need to work with renderers. If you have any questions, contact me!
Kaynak www.dreamincode.net/forums/showtopic25042.htm