Animate.css Kullanımı 
 Step 1: Download/Upload the plugin
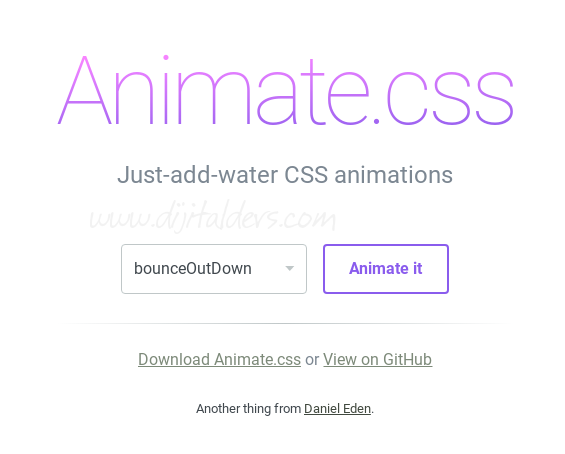
This one is pretty simple. Click on the “Download on Github” link on the page, or click this link to visit the https://daneden.github.io/animate.css/. If you know what a .min.css file is, go right ahead and just use that version. If you don’t, click on the animate.css link in the middle of the page to access it’s set of coding.
After clicking animate.css you’ll be taken to another GitHub page with options along the top. From here, click Raw. This will load the plugin’s full coding spectrum in basic text format. From here, you can copy and paste this into a file called animate.css, or simply go to File > Save Page As.
Obviously save the file to someplace on your computer that you’ll actually be able to find it again. With the file downloaded locally on your system, you’re now ready to upload the file to your FTP server. If you do not know how to do this, just…just stop reading this tutorial. No problem helping you out, but uploading to a server is 100 level stuff which we’re not covering here.
Step 2: Add the Plugin To Your Pages
Same as you would load in any kind of file (css, js, etc.), we’re going to need to place a call to the file within the head of your HTML page (or your header.php include).
|
1 |
|
Honestly, that’s about it. From this stage alone, we’re ready to start taking advantage of the cool little CSS3 animations.
Step 3: Adding Animation to an Element
Looking at the code on the Animate.css page will help you none. Their coding is setup to process entirely through a set of javascript using the data-test attribute. Which, as you may have already found out, helps you none!
Note: Animation must be added to elements that have a height and width. For instance, adding it to an <a> tag that has an element floated within it isn’t going to be of much use. You need to have something for it to actually animate.
To add animation, we’re simply going to add a class to the element. So if we have:
|
1 |
|
We’re just going to add a source attribute for a class of “animated” and then whichever effect we’d like the object to replicate.
|
1 |
|
Now, on page load, our element will load with a little bounce in it’s step.
If you’re having problems, create a copy of your page and start deconstructing it. Remove all of the elements you’re not working with it to at least get this working in it’s most basic form. If it’s still not working, then you’ll need to begin to check things like the site path and more.
Easiest way to check the site path is to view the source of the page. Most browsers these days will create links out of any external file references on the page. Click on the animate.css link from within the view source view. If it looks like you’re loading a 401 page instead of the Raw code we copied over, it’s possible your file isn’t linked correctly, or you forgot to upload it.
Step 4: Create a Hover/Click Event
Unless we want our page going nuts when it first loads up, it’s possible we want to control these animations either on hover or click. You can find a full video tutorial documenting a setup procedure, as well as these original functions over at Jose Browne’s Online Playground.
Inline markup isn’t going to always be the prettiest and goes against our basic rules of separation between content, presentation and functionality. Jose has created the following 2 functions specifically for Animate.css integration. Copy and paste one, or both, of these scripts onto your page; or, into a scripts.js file if you’re trying to keep everything neatly organized.
Initiate Animation on Hover
|
1 2 3 4 5 6 7 8 9 10 11 12 13 |
|
Initiate Animation on Click
|
1 2 3 4 5 6 7 8 9 10 11 12 |
|
To call these functions, we’ll need to write a little chunk of jQuery. The purpose is just to let it know which elements require which function. So if we had a group of images, we would give them a call and call that through the jQuery. In our case, we’re only applying this animation to the logo, so we only need “#logo”.
|
1 2 3 4 5 |
|
To the function, we’re simply passing “this”, since we’re running the function on each iteration of #logo and then a designated animation. In our case, “bounce”. Simply swap out the function name to run the function onClick instead of onHover and you’ve got yourself a designated click action.
Kaynaklar: