Java Applet Layout Kullanımları 
setLayout(null); setLayout(new FlowLayout()); setLayout(new BorderLayout()); new CardLayout(); Yerleşim Yöneticileri
A container uses a layout manager to position all its components.
A layout manager computes four properties (x, y, width, and height) of all components in a container.
A layout manager is an object of a Java class that implements the LayoutManager interface or LayoutManager2 interface. LayoutManager2 interface inherits from the LayoutManager interface. Both interfaces are in the java.awt package.
The following list is layout managers we often use.
- FlowLayout
- BorderLayout
- CardLayout
- BoxLayout
- GridLayout
- GridBagLayout
- GroupLayout
- SpringLayout
Every container has a default layout manager. The default layout manager for the content pane of a JFrame is BorderLayout.
For a JPanel, the default layout manager is FlowLayout.
We can change the default layout manager of a container by using its setLayout() method.
To remove a layout manager, we can pass null to the setLayout() method.
The getLayout() method of a container returns the reference of the layout manager the container is currently using.
The following code shows how to set FlowLayout as the layout manager for the content pane of a JFrame
JFrame  frame  = new JFrame("Frame");
Container contentPane = frame.getContentPane();
contentPane.setLayout(new FlowLayout());
The following code shows how to set BorderLayout as the layout manager for a JPanel.
JPanel panel = new JPanel();
panel.setLayout(new BorderLayout());
To get the layout manager for a container use the following code
LayoutManager layoutManager = container.getLayout()
BorderLayout
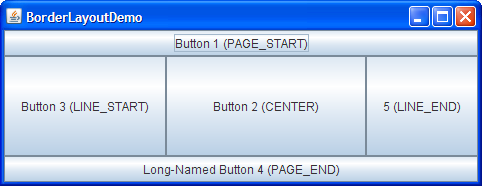
Every content pane is initialized to use a BorderLayout. (As Using Top-Level Containers explains, the content pane is the main container in all frames, applets, and dialogs.) A BorderLayout places components in up to five areas: top, bottom, left, right, and center. All extra space is placed in the center area. Tool bars that are created using JToolBar must be created within a BorderLayout container, if you want to be able to drag and drop the bars away from their starting positions. For further details, see How to Use BorderLayout.
BoxLayout
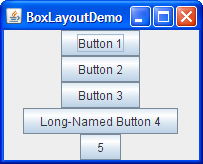
The BoxLayout class puts components in a single row or column. It respects the components' requested maximum sizes and also lets you align components. For further details, see How to Use BoxLayout.
CardLayout
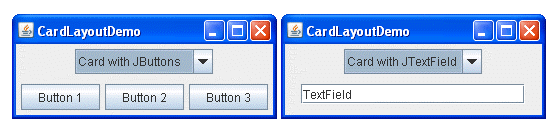
The CardLayout class lets you implement an area that contains different components at different times. A CardLayout is often controlled by a combo box, with the state of the combo box determining which panel (group of components) the CardLayout displays. An alternative to using CardLayout is using a tabbed pane, which provides similar functionality but with a pre-defined GUI. For further details, see How to Use CardLayout.
FlowLayout

FlowLayout is the default layout manager for every JPanel. It simply lays out components in a single row, starting a new row if its container is not sufficiently wide. Both panels in CardLayoutDemo, shown previously, use FlowLayout. For further details, see How to Use FlowLayout.
GridBagLayout
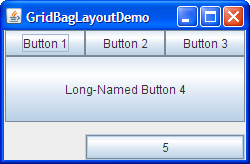
GridBagLayout is a sophisticated, flexible layout manager. It aligns components by placing them within a grid of cells, allowing components to span more than one cell. The rows in the grid can have different heights, and grid columns can have different widths. For further details, see How to Use GridBagLayout.
GridLayout

GridLayout simply makes a bunch of components equal in size and displays them in the requested number of rows and columns. For further details, see How to Use GridLayout.
GroupLayout
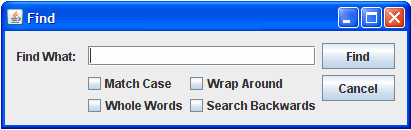
GroupLayout is a layout manager that was developed for use by GUI builder tools, but it can also be used manually. GroupLayout works with the horizontal and vertical layouts separately. The layout is defined for each dimension independently. Consequently, however, each component needs to be defined twice in the layout. The Find window shown above is an example of a GroupLayout. For further details, see How to Use GroupLayout.
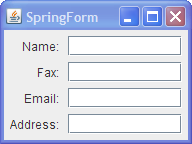
SpringLayout

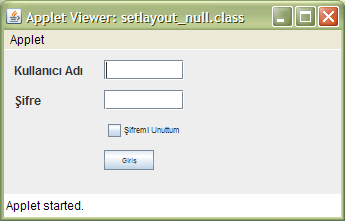
Yerleşim Yönetici Yokken
import java.awt.Font;
import javax.swing.JApplet;
import javax.swing.JButton;
import javax.swing.JCheckBox;
import javax.swing.JLabel;
import javax.swing.JTextField;
public class setlayout_null extends JApplet {
JLabel KullaniciAdi=new JLabel("Kullanıcı Adı");
JLabel Sifre=new JLabel("Şifre");
JLabel SifremiUnuttum=new JLabel("Şifremi Unuttum");
JButton Giris=new JButton("Giriş");
JCheckBox UnuttumKutusu=new JCheckBox();
JTextField KullaniciAdiKutusu=new JTextField(10);
JTextField SifreKutusu=new JTextField(10);
public void SetLayoutNULLYerlesticisi(int x, int y, int En, int Boy, Component Nesne){
Nesne.setLocation(x, y);
Nesne.setSize(En, Boy);
}
public void init() {
//YERLESİM YONETİCİ YOKKEN
setLayout(null);
//KullaniciAdi.setLocation(10, 10);
//KullaniciAdi.setSize(80, 20);
SetLayoutNULLYerlesticisi(10, 10, 80, 20, KullaniciAdi);
add(KullaniciAdi);
SetLayoutNULLYerlesticisi(10, 40, 80, 20, Sifre);
add(Sifre);
SetLayoutNULLYerlesticisi(100, 10, 80, 20, KullaniciAdiKutusu);
add(KullaniciAdiKutusu);
SetLayoutNULLYerlesticisi(100, 40, 80, 20, SifreKutusu);
add(SifreKutusu);
SetLayoutNULLYerlesticisi(100, 70, 20, 20, UnuttumKutusu);
add(UnuttumKutusu);
SetLayoutNULLYerlesticisi(120, 70, 200, 20, SifremiUnuttum);
SifremiUnuttum.setFont(new Font("Dialog", Font.PLAIN, 8));
add(SifremiUnuttum);
SetLayoutNULLYerlesticisi(100, 100, 50, 20, Giris);
Giris.setFont(new Font("Dialog", Font.PLAIN, 7));
add(Giris);
}
}
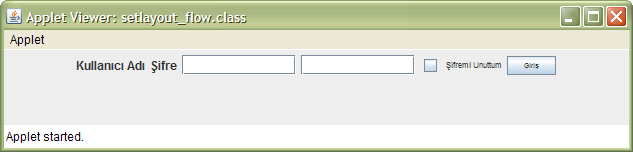
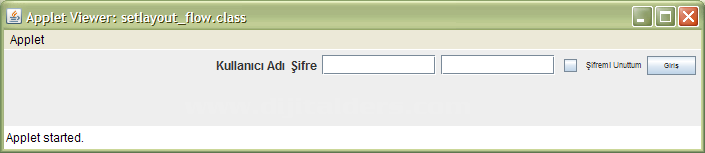
FlowLayout Kullanımı
import java.awt.Component;
import java.awt.FlowLayout;
import java.awt.Font;
import javax.swing.JApplet;
import javax.swing.JButton;
import javax.swing.JCheckBox;
import javax.swing.JLabel;
import javax.swing.JTextField;
public class setlayout_flow extends JApplet {
JLabel KullaniciAdi=new JLabel("Kullanıcı Adı");
JLabel Sifre=new JLabel("Şifre");
JLabel SifremiUnuttum=new JLabel("Şifremi Unuttum");
JButton Giris=new JButton("Giriş");
JCheckBox UnuttumKutusu=new JCheckBox();
JTextField KullaniciAdiKutusu=new JTextField(10);
JTextField SifreKutusu=new JTextField(10);
public void init() {
//YERLESİM YONETİCİ FLOWLAYOUT
setLayout(new FlowLayout(FlowLayout.RIGHT));
add(KullaniciAdi);
add(Sifre);
add(KullaniciAdiKutusu);
add(SifreKutusu);
add(UnuttumKutusu);
SifremiUnuttum.setFont(new Font("Dialog", Font.PLAIN, 8));
add(SifremiUnuttum);
Giris.setFont(new Font("Dialog", Font.PLAIN, 7));
add(Giris);
}
}
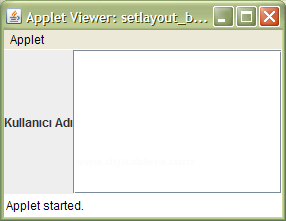
BorderLayout Kullanımı
import java.awt.BorderLayout;
import java.awt.Component;
import java.awt.FlowLayout;
import java.awt.Font;
import javax.swing.JApplet;
import javax.swing.JButton;
import javax.swing.JCheckBox;
import javax.swing.JLabel;
import javax.swing.JTextField;
public class setlayout_border extends JApplet {
JLabel KullaniciAdi=new JLabel("Kullanıcı Adı");
JLabel Sifre=new JLabel("Şifre");
JLabel SifremiUnuttum=new JLabel("Şifremi Unuttum");
JButton Giris=new JButton("Giriş");
JCheckBox UnuttumKutusu=new JCheckBox();
JTextField KullaniciAdiKutusu=new JTextField(10);
JTextField SifreKutusu=new JTextField(10);
public void init() {
//YERLESİM YONETİCİ BORDERLAYOUT
setLayout(new BorderLayout());
add(KullaniciAdi, BorderLayout.WEST);
//add(Sifre);
add(KullaniciAdiKutusu, BorderLayout.CENTER);
/*
add(SifreKutusu);
add(UnuttumKutusu);
SifremiUnuttum.setFont(new Font("Dialog", Font.PLAIN, 8));
add(SifremiUnuttum);
Giris.setFont(new Font("Dialog", Font.PLAIN, 7));
add(Giris);
*/
}
}
CardLayout Kullanımı
import java.awt.FlowLayout;
import java.awt.event.ActionEvent;
import java.awt.event.ActionListener;
import javax.swing.ImageIcon;
import javax.swing.JApplet;
import javax.swing.JButton;
import javax.swing.JLabel;
import javax.swing.JPanel;
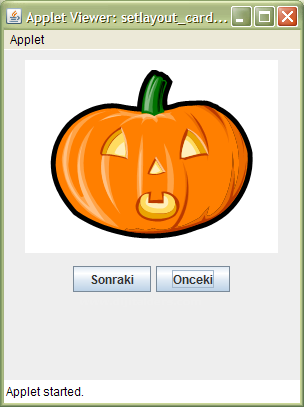
public class setlayout_card extends JApplet implements ActionListener{
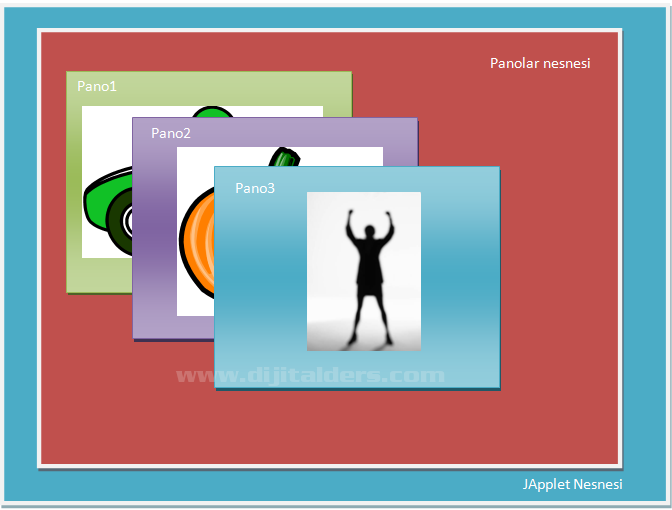
//Pano1, Pano2, Pano3 un yerleşeceği Panel
//ve bu panel CardLayout tipini kullanıyor
CardLayout KartLayout=new CardLayout();
JPanel Panolar=new JPanel(KartLayout);
//Resimlerin eklenecegi paneller
JPanel Pano1=new JPanel(new FlowLayout());
JPanel Pano2=new JPanel(new FlowLayout());
JPanel Pano3=new JPanel(new FlowLayout());
JButton Sonraki=new JButton("Sonraki");
JButton Onceki=new JButton("Onceki");
int ButonSayac=0;
public void init() {
//JAppletin Layout tipi
setLayout(new FlowLayout());
//Pano1 icin yapilan islemler
//Resim1 nesnesi olusturuluyor
ImageIcon Resim1= new ImageIcon(getImage(getDocumentBase(),"resimler/resim1.png"));
JLabel ResimTutucu1=new JLabel(Resim1);
//ResimTutucuyu Pano1 nesnesine ekle
Pano1.add(ResimTutucu1);
//Panolar panosuna Pano1 ekleniyor.
Panolar.add(Pano1, "Panomuz1");
//Pano2 icin yapilan islemler
JLabel ResimTutucu2=new JLabel(new ImageIcon(getImage(getDocumentBase(),"resimler/resim2.png")));
Pano2.add(ResimTutucu2);
Panolar.add(Pano2, "Panomuz2");
//Pano3 icin yapilan islemler
JLabel ResimTutucu3=new JLabel(new ImageIcon(getImage(getDocumentBase(),"resimler/resim3.png")));
Pano3.add(ResimTutucu3);
Panolar.add(Pano3, "Panomuz3");
//Panolar nesneside JApllete ekleniyor
add(Panolar);
Sonraki.addActionListener(this);
add(Sonraki);
Onceki.addActionListener(this);
add(Onceki);
}
public void actionPerformed(ActionEvent Olay){
if(Olay.getSource()==Sonraki){
ButonSayac++;
}
else{
ButonSayac--;
}
ButonSayac=Math.abs(ButonSayac)%3;
switch(ButonSayac){
case 1: KartLayout.show(Panolar, "Panomuz2"); break;
case 2: KartLayout.show(Panolar, "Panomuz3"); break;
default: KartLayout.show(Panolar, "Panomuz1"); break;
}
}
}
Kaynaklar:
- http://www.java2s.com/Tutorials/Java/Java_Swing/0500__Java_Swing_Layout.htm
- https://docs.oracle.com/javase/tutorial/uiswing/layout/visual.html